Creating FTP client and setting up FTP server using Filezilla is so simple and easy however connecting it and setting it up with Hostgator account is kinda tough especially for a newbie. But in here, you’ll get the easiest and most effective way how to configure your Hostgator ftp account using Filezilla, the most safe and most trusted FTP program in the web today.
If you are planning to use the famous Thesis platform with your WordPress website, you need to use ftp client like Filezilla to install your Thesis platform and themes.
Why do we need FTP anyway?
FTP a.ka. File Transfer Protocol is a major requirement in website building and website administration. As an admin of a website, you use this much often to upload and transfer web pages and files easily from your computer to your web-hosting server such as Hostgator, GoDaddy, DreamHost and the others.
With this you can have full access and control over your website content and all its users too. You can set restrictions and allow anonymous or trusted users depending on your configuration. You may usually grant access to users by setting up login username and password. In short, you have the full authority to grant access in your websites.
However, we can only do that by using a third-party FTP program such as Filezilla to access, upload and control files. And this is discussed here.
Things you’ll need to configure Hostgator FTP to Filezilla
- Your website (example: mywebsite.com)
- Hostgator Cpanel account – with your own username and password
- Filezilla –it’s free to download this
- Of course a computer with internet connection
How to Connect Hostgator FTP Client using Filezilla?
The steps below show how to connect the two easily without adding your website in the Site Manager and using the manual way of adding your website and importing your FTP file from Hostgator to the site manager. It’s the fastest way to connect. You can connect your ftp to Filezilla without logging in to your Cpanel.
However, if you want to configure manually using the other method, you can do so by following the other method which was also explained on the next part.
Step 1: Download and install Filezilla by going to filezilla-project.org and choose the appropriate software that suits your computer and operating system – Windows, Mac OS X, Linux, Source Code and Checksums
Step 2: Open Filezilla icon in your computer
Step 3: In the four boxes at the top, type in your details. Follow the pattern below.
- Host: your website name
- Username: the username Hostgator sent you on the Welcome email
- Password: the password Hostgator sent you on the Welcome email, it is case sensitive by the way so be careful typing
- Port: 21 The client computer is able to connect with the server on port 21

Step 4. Click Quickconnect and you’ll see the command and response from the server. You will see directory listing successful here. You’re done quick connecting.
How to Configure Hostgator FTP Client in Filezilla Manually?
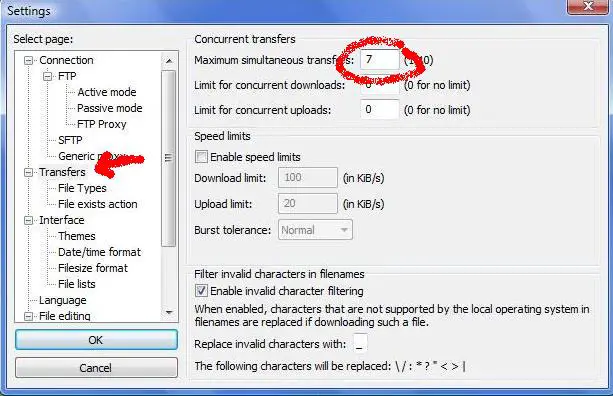
Though this is done via manual settings, I am still giving the trick on how to make it fast. Firstly, you need to set up your Transfer speed and loading in Filezilla by going to the Edit menu on top of your Filezilla window and tapping Settings, then select Transfers. Adjust your Maximum Simultaneous transfers to 7 instead. The default was 2, it’s kinda slow. Click OK then you’re ready to connect your Hosgator ftp accont to Filezilla.
Step 1. Log in to your Hostagtor Cpanel.
Step 2. Go over the Files and tap FTP Files.
Step 3. Choose the ftp account you want to connect. Usually it is the one you use to login in your Cpanel for a particular website. You can also create another FTP when you learned about them in the coming days. In this discussion, we are using the FTP that is already listed. It’s usually has the human icon, shown below.

Step 4. Click Configure FTP Client found at the side. Your manual settings details will appear then.
Step 5. Choose Filezilla and follow the configuration instructions by tapping it. Follow through and you’re done.
The connection works when you don’t type anything in the port box. All your ftp account values will appear anyway since you have imported them. If you the result was failed directory listing and can’t connect to the server, something was wrong with your values. Try connecting via SFTP or secure ftp and repeat the process. Don’t forget to close your Filezilla window whenever you try another connection.